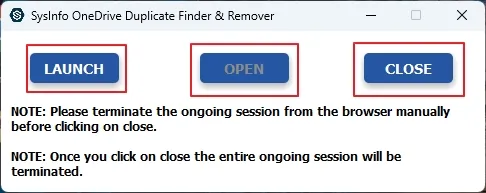
Step 1: Run OneDrive Duplicate Remover
Download, install, and run the OneDrive Duplicate Finder Tool. You will get three options at the start:
- Launch: Use it to start the software and access it on the browser.
- Open: This button enables you to reopen the software panel where you left off before the accidental exit.
- Close: It is to exit the software application completely after you have used it for duplicate removal.
Initially, click Launch to begin the software.
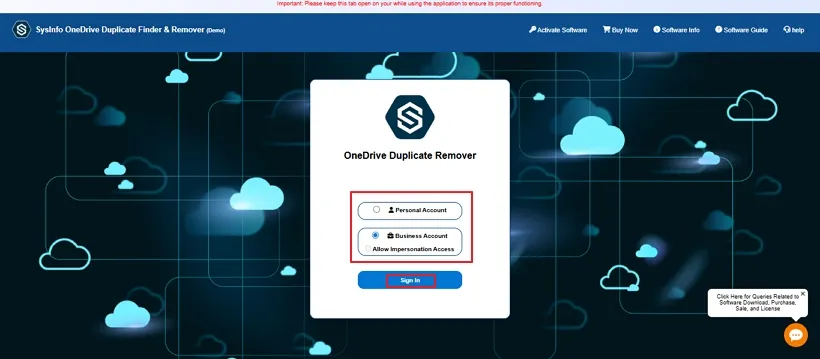
Step 2: Select OneDrive Account Type
Now, you will be redirected to the browser where the software runs. Select either Personal or Business Account for your OneDrive and click Sign In.
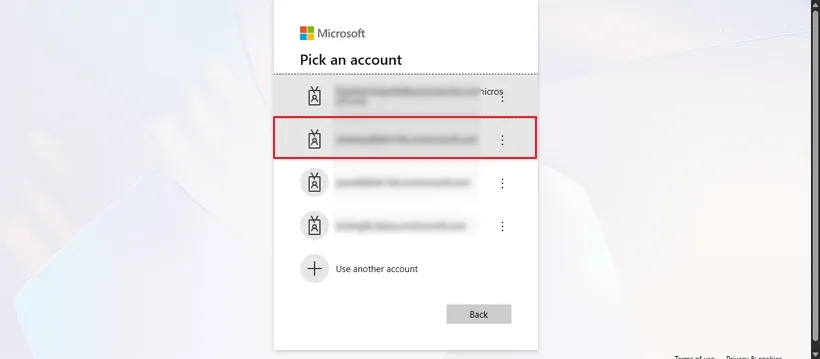
Step 3: Select OneDrive Account
In the next window, choose the Microsoft account connected to your OneDrive account to proceed with the login.
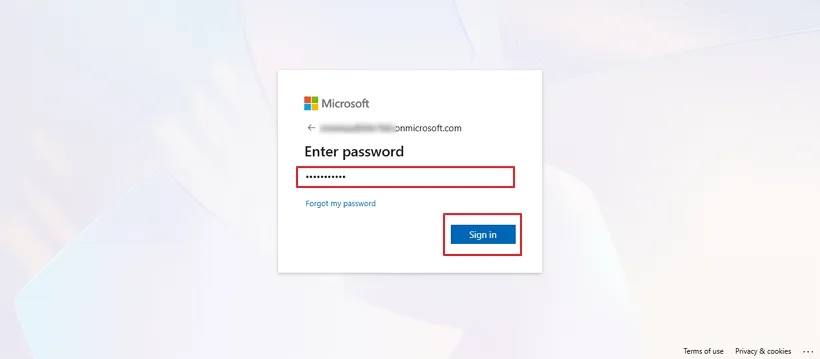
Step 4: Complete Sign Up
Next, enter the password for your account and click Sign In to log in to your OneDrive.

Step 5: Authentication Successful
Once you click Sign In, a new browser window opens with the authentication successful message as shown below.
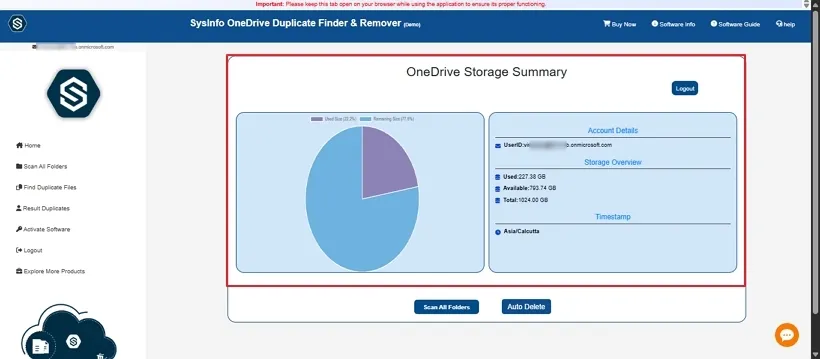
Step 6: Preview OneDrive Storage
Once inside the software, the first panel gives a preview of your storage summary. It shows all important details like the User ID, Total, Used, and Available Space, and Timestamp.
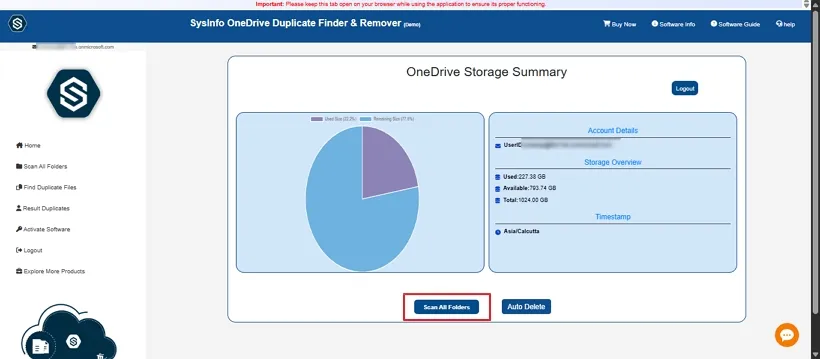
Step 7: Scan Folders
Now, after the preview, click the Scan All Folder button to check the folders, locate duplicates, and then delete as desired.
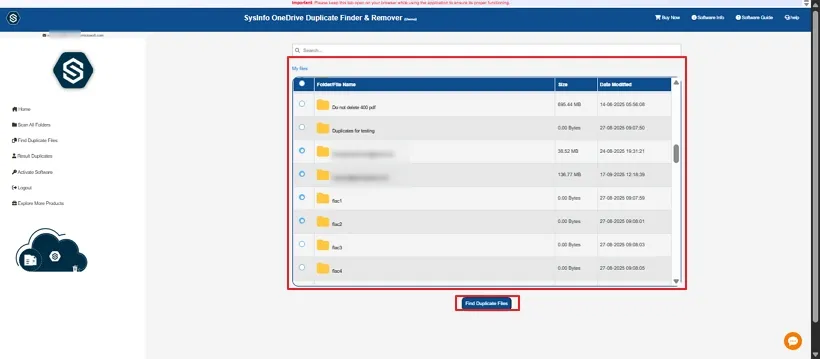
Step 8: Find Duplicates
A list of all the folders in your OneDrive appears after the scanning completes. Select the folders and click the Find Duplicate Files button to search for duplicates in the folders selected.
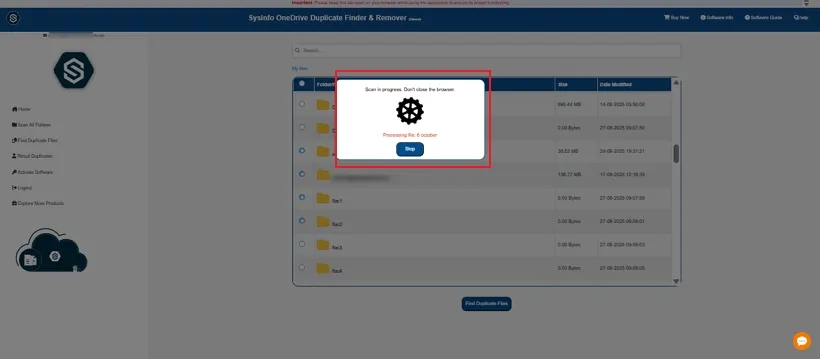
Step 9: Duplicates Scanning
Wait until all the duplicate files are scanned from the OneDrive folder selected. You can click the Stop button in between to halt the process if desired.
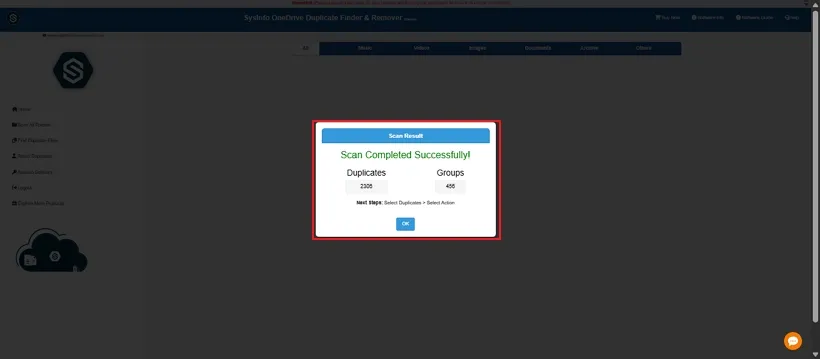
Step 10: Duplicates Identified
Once the scanning completes, the software displays the total no of duplicate files found in your OneDrive folder groups. Click OK.
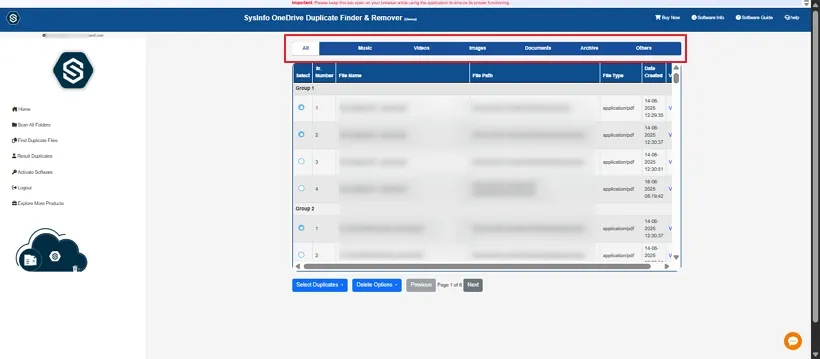
Step 11: Select File Type
Now, you get different options where you can find and delete duplicates. You can choose to search for similar files altogether or in Documents, Music, Videos, Image, Archive, and Others separately as desired.
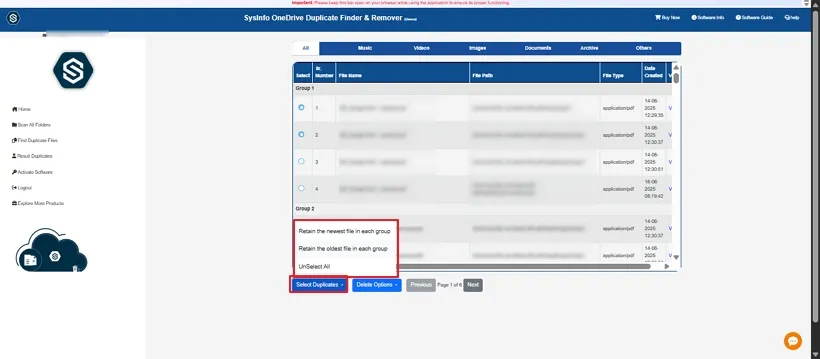
Step 12: Duplicate Selection Option
Further, you can apply the filters to retain duplicates with the Select Duplicates button. It gives you three options:
- Retain the Newest File in Each Group: To identify the newest files and delete old duplicates from each set.
- Retain the Oldest File in Each Group: To identify the oldest files and delete the newest duplicates from each set.
- UnSelect All: To deselect all the selected duplicate files from the displayed results.
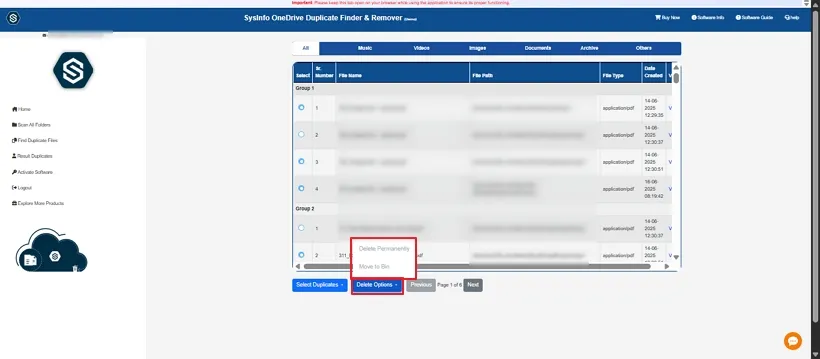
Step 13: Manage Duplicates
Once you choose the duplicates to eliminate, click the Delete Option button to select how to manage them. You get two options here:
- Delete Permanently: To remove duplicates permanently and free the OneDrive Storage.
- Move to Trash: It removes duplicates temporarily into your OneDrive Trash folder, in case you want to restore any file.
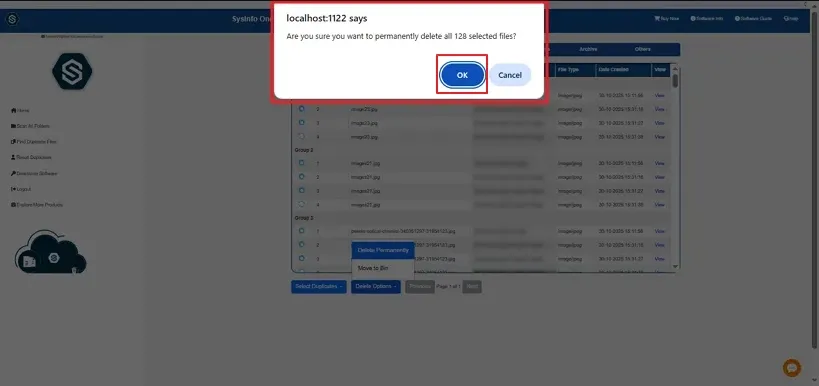
Step 14: Confirm De-Duplication
Once you choose to Delete or Trash duplicates, a confirmation pop-up appears. Click OK to confirm.
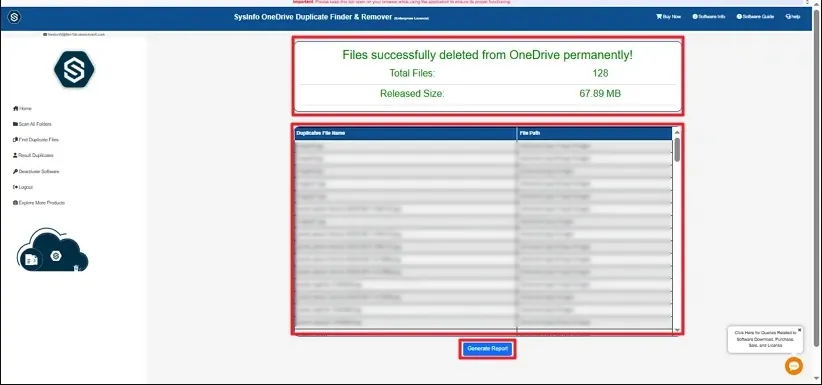
Step 15: Deletion Successful
Finally, all the duplicate files will be deleted, and you can see the successful message with no of duplicates deleted and the space freed from OneDrive. Also, there is a Generate Report button, which you can use to download a CSV for the complete de-duplication report view.
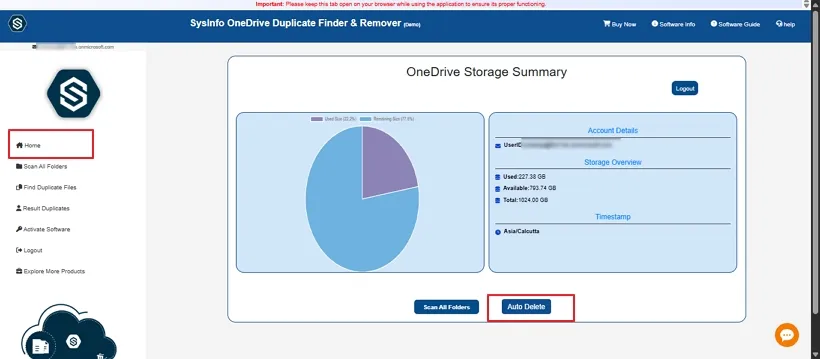
Step 16: Auto-Delete Feature
Besides deleting files in groups by selection, this tool also offers an Auto Delete feature. You can choose it from the Home page.

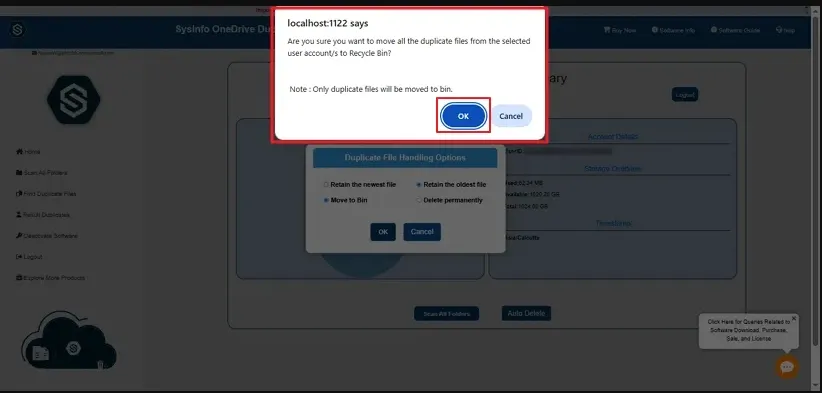
Step 17: Auto Delete Options
After you choose to Auto Delete, a dialog appears with options for how you want to manage the auto-deletion of OneDrive duplicates. The options available are:
- Retain the Newest File: Stores the latest version and deletes older duplicates in OneDrive.
- Retain the Oldest File: Preserve the original file and remove the duplicates in the newer versions.
- Move to Bin: Sends OneDrive duplicates to the Recycle Bin for easy recovery in a later period.
- Delete Permanently: Eliminates duplicates completely from OneDrive without an option for recovery.
Pick the option for how you want to manage deletion and click OK.
Step 18: Auto-Delete Duplicates
After the selection, a pop-up appears to ask for confirmation to complete the auto-deduplication as per the selected option. Click OK to confirm.

Step 19: Deleted OneDrive Duplicates
After confirmation, all your duplicates are deleted, and the count and size are displayed. You can click Download Report to check the CSV report of your process. If done, you can press Sign Out at the top to exit this Drive Account and continue with duplication removal for others.
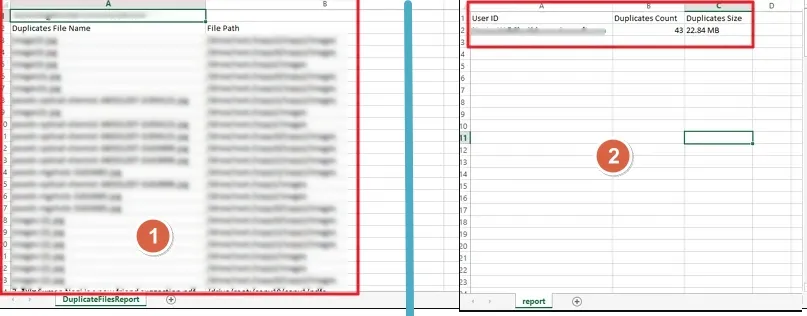
Step 20: Check Duplication Removal Report
The CSV Report downloaded can be opened with Excel. Here you can see both downloaded reports, whether selective duplicate removal or auto duplicate removal. The first report is for the selective removal, and the second one is for auto removal.