-
Written By Amit Chandel
-
Updated on January 9th, 2026
How to Easily Migrate IMAP to Office 365 Without Losing Emails
User Searched Query :
I have a few users on an IMAP-based local email setup that I want to move to Office 365. Old Office apps and M365 Business Premium accounts already created. Looking for the easiest way to move everything. PST export/import via Outlook is one option, either on-site or from a faster location. O365 IMAP migration isn’t ideal since it skips contacts and calendars. Also open to a paid tool that can migrate emails and possibly user data, such as Desktop or Documents. Any simple, reliable suggestions welcome.
~ Nick Brights
Do you want to migrate IMAP to Office 365 with all your important emails and relevant data? This blog will help you to explain everything from the start to the end of the migration. In this blog, we will cover each step in a way to avoid any errors. We will cover the manual methods and the professional IMAP Backup Tool for proficient migration.
Why Migrating IMAP to Office 365 is Important?
- IMAP mail can fail or go offline because it is dependent on the local server.
- O365 provides regular updates and better built-in security features.
- Emails are automatically backed up, which saves effort later.
- Managing users and mailboxes becomes easier for admins.
- Overall, email access is smoother and more reliable for everyone.
Additionally, some users want to backup IMAP to PST for future reference. They can take reference from here to backup emails without hassle.
Short Comparison Between IMAP and Office 365
|
IMAP Mail |
Office 365 |
|
Uses a local or third-party mail server |
Runs fully on Microsoft’s cloud |
|
Mostly email only |
Email plus calendar, contacts, and apps |
|
Limited security options |
Built-in security and regular updates |
|
Depends on server health |
No local server to manage |
|
Access can be restricted |
Access from anywhere, any device |
|
Manual backups needed |
Automatic backup and recovery |
Quick Manual Solutions to Migrate IMAP to Office 365
Here, we covered the two very quick manual steps that are practical for a small migration. The user needs to have some knowledge about M365 and Outlook to avoid errors and achieve the goal.
#1: IMAP to O365 migration Using Microsoft 365 Admin Center
- Firstly, create a CSV file with users’ emails, usernames, and passwords.
- Then, verify your domain in the Microsoft 365 Admin Center.
- After that, assign Microsoft 365 licenses to all users.
- Thereafter, set up a migration endpoint with your IMAP server info.
- Further, go to Data Migration to choose Migration.
- Then, create a migration batch for your Office 365 in the EAC.
- Afterward, upload the CSV file for the IMAP accounts that you want to migrate.
- Start the migration and monitor progress.
- Finally, wait for the final sync and complete the migration batch.
- After migration, update your domain’s MX records to Office 365.
#2: Use Drag & Drop to Import IMAP email to Office 365
- Firstly, add both the old IMAP account and the new Office 365 account to Outlook.
- Thereafter, let Outlook sync the emails.
- Then, drag emails from the old inbox and drop them into the Office 365 inbox.
- Finally, wait for Outlook to upload the emails to Office 365.
Limitations:
- You need users’ passwords, which can be hard to collect or manage.
- It works best for small to medium-sized migrations, not very large mailboxes.
- If there are connection issues or server limits, migration can slow down or fail.
- There’s a risk of missing some emails if you forget to drag everything.
- Contacts and calendars still need separate handling.
Pro Method to Migrate IMAP to Office 365 Easily
To handle limitation of the manual method, we have MailConverterTools IMAP Backup Software that can migrate small, medium, and even large numbers of files. This software can be used for multiple purposes, for instance, to migrate email from one host to another and more. This tool gives you 100% accurate results and makes sure that your folder structure will remain the same.
Steps to import IMAP to Office 365
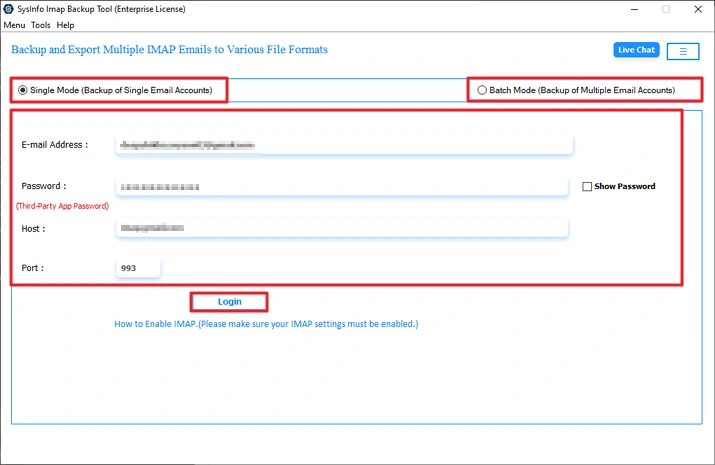
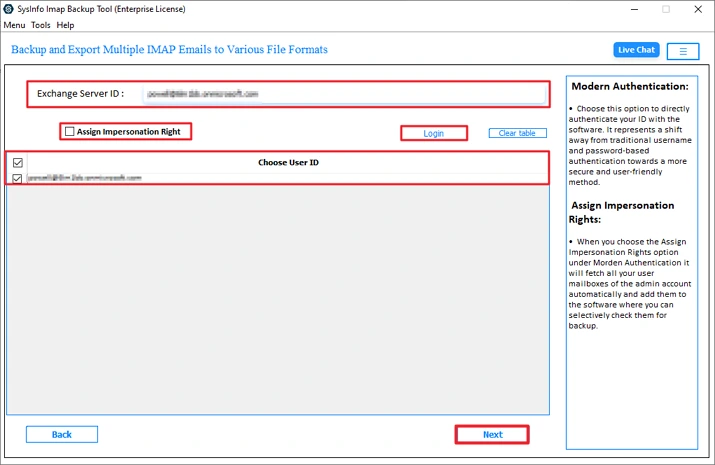
- Firstly, download the tool, choose the mode, and log in with IMAP credentials.
- Then, preview and select a file from the tree structure.

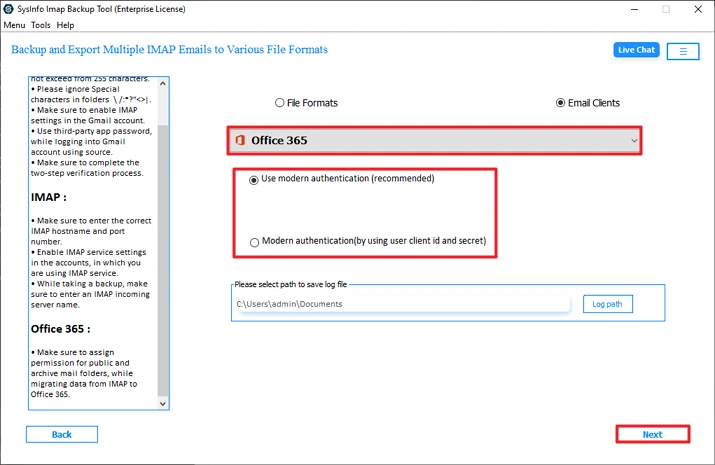
- After that, choose Office 365 and the authentication option.
- Thereafter, log in and choose User ID.
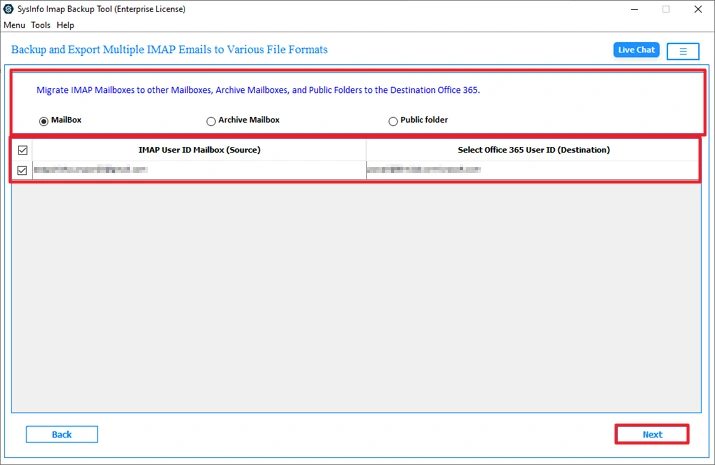
- Further select the mailbox and click Next.
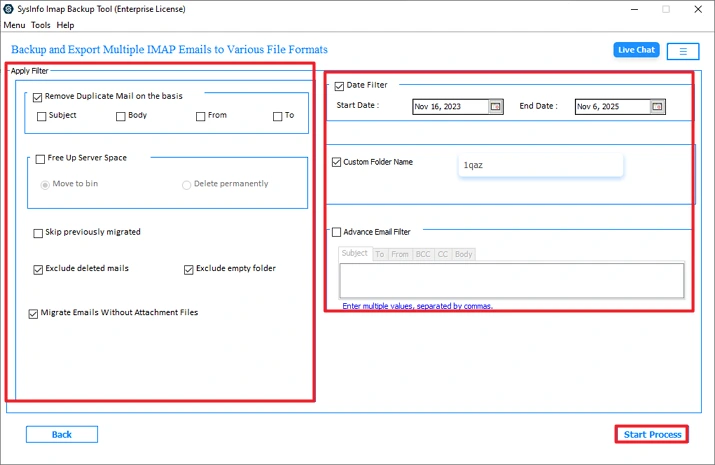
- Finally, apply the filters and click Start Process.
Successful User Case
From: Martin
To: MailConverterTools Team
I find this tool very useful and effective for IMAP to Office 365 migration. Also, I explored more options that help me to migrate IMAP to Zoho Mail. This tool provides accurate results without affecting the data and attachments in the email.
Conclusion
To conclude, this blog gives you fine solutions to migrate IMAP to Office 365. You can use any method to migrate according to your needs. Always understand and implement every step carefully to get the best outcome. Any incorrect step can cause problems and sometimes become the reason for the data loss. To avoid these things, using a professional tool is an easy and reliable solution.
Frequently Asked Questions
Q1: Which is the best tool for IMAP to Office 365 Migration with Attachments?
Ans: The MailConverterTools IMAP Backup Software is the best tool if you want to migrate files with attachments. This tool make sures no data loss and results in very minimal time.
Q2: Is it possible to import IMAP to Office 365 for multiple users?
Ans: Yes, the professional IMAP Backup Software of MailConverterTools allows you to migrate multiple users. Its assign impersonation feature allows you to migrate more than one user with accuracy.
Q3: Is IMAP to Office 365 migration secure?
Ans: Yes, it is totally secure, but it depends on how you are migrating. Using the manual method can cause errors and is not totally secure. The professional and advanced tool is the perfect choice for safe migration.
Q4: How do I avoid duplicate emails during IMAP to Office 365migration?
Ans: Advanced IMAP Backup Software provides you with the feature to remove duplicate emails. These features enhance and optimize the final results.
About The Author:
Meet Amit, an experienced SEO expert and content planner. He uses his creativity and strategy to create content that grabs attention and helps brands reach their goals. With solid skills in digital marketing and content planning, Amit helps businesses succeed online.
Related Post